
Curtains for the Nursery (And How to Make Your Own Lined Curtain Panels)

I did it! She may be NINE months now, but I finally finished the curtains in Beatrix’s room! It’s not that making them was especially daunting – every room in our house boasts handmade window treatments because curtains are expensive (factor in 10’ ceilings and custom is really our only option). It took me so long because the supposed-to-be-temporary solution, wherein I hastily clipped up a blackout lining pilfered from our bedroom windows, was just working out too well. It wasn’t pretty, but baby girl was sleeping.


Because one side of the window frame sits very close to the closet door, my original plan was just to have a single panel on the opposite side for balance. I liked the idea of a casual cascade or maybe a loose drape à la an opulent Parisian boudoir. I fell hard for the Rose Clouds Aqua fabric sourced from fabric.com (sadly sold out, but still available in this colorway). And I wasn’t completely unprepared. Just hours before I went to the hospital I spent my early labor at home neurotically scrambling around making and hanging (or rather, having Luke hang) the finished panel.

But in my FTM shortsightedness I lined it with regular, not blackout, lining. I guess I thought my child would somehow be the one kid in the world who could nap with cheery rays of sunbeams prancing about the room. And… a single panel, while pretty, wasn’t cutting it. It was just too small. Of course, it wouldn’t be until we transferred Bea to her crib around 3 months that I realized any of this, hence why this project has been so long in the making. Now that they’re done and in place I’m thrilled! It’s the first thing you see when entering the nursery and the punchy floral is whimsical, feminine, and a bit wild, perfect for our babe’s room.
Below are instructions for making your own lined curtain panels!

Step 1.
Cut curtain fabric 11” longer than desired finished length
I like my curtains to just barely skim the floor so after determining the finished length I wanted, I cut my fabric 11” longer to allow for thick bottom and top hems. Depending on how the fabric was cut from the bolt chances are it’s not quite perfectly straight so make sure it’s square before you start cutting to your exact measurements.
Step 2.
Cut lining fabric 2.5” longer than desired curtain length and at least 3” narrower than curtain fabric
The trick to creating a professional-looking side seam is to ensure the overall width of your lining fabric is smaller than your curtain fabric – anywhere from 3” to 6” narrower will work.

Step 3.
Hem bottom of curtain fabric
Fold bottom of curtain fabric up 4”, press with iron, then fold another 4”, press and pin in place.


Now sew a straight stitch along the top of your fold. It’s a lot of fabric to devote to a hem, but a 4” double fold creates such good structure helping the curtain hang perfectly. If you want to get really fancy you can even add small weights to the inside of the hem, but it’s not necessary.

Step 4.
Hem bottom of lining fabric
Create the same type of hem on the lining. Only this time fold the fabric up 2”, press, then fold another 2”.
Step 5.
Attach lining to curtain fabric
Ok! Now we’re getting somewhere. With right sides together (which means lay the curtain fabric right side up and the lining right side down) place the lining 2” from the bottom of the curtain fabric. It won’t go all the way to the top of the curtain fabric and that’s ok. Then stitch each of the long sides together. Since your lining is narrower than the curtain fabric the lining will be taut while the curtain fabric has some slack. This is exactly what you want. Pin, then stitch one side, then do the same to the other.

Step 6.
Turn it right-side out
Once each side is stitched together, turn your curtain panel (which is basically a giant pillow case) right-side out and get excited. You’re almost done!

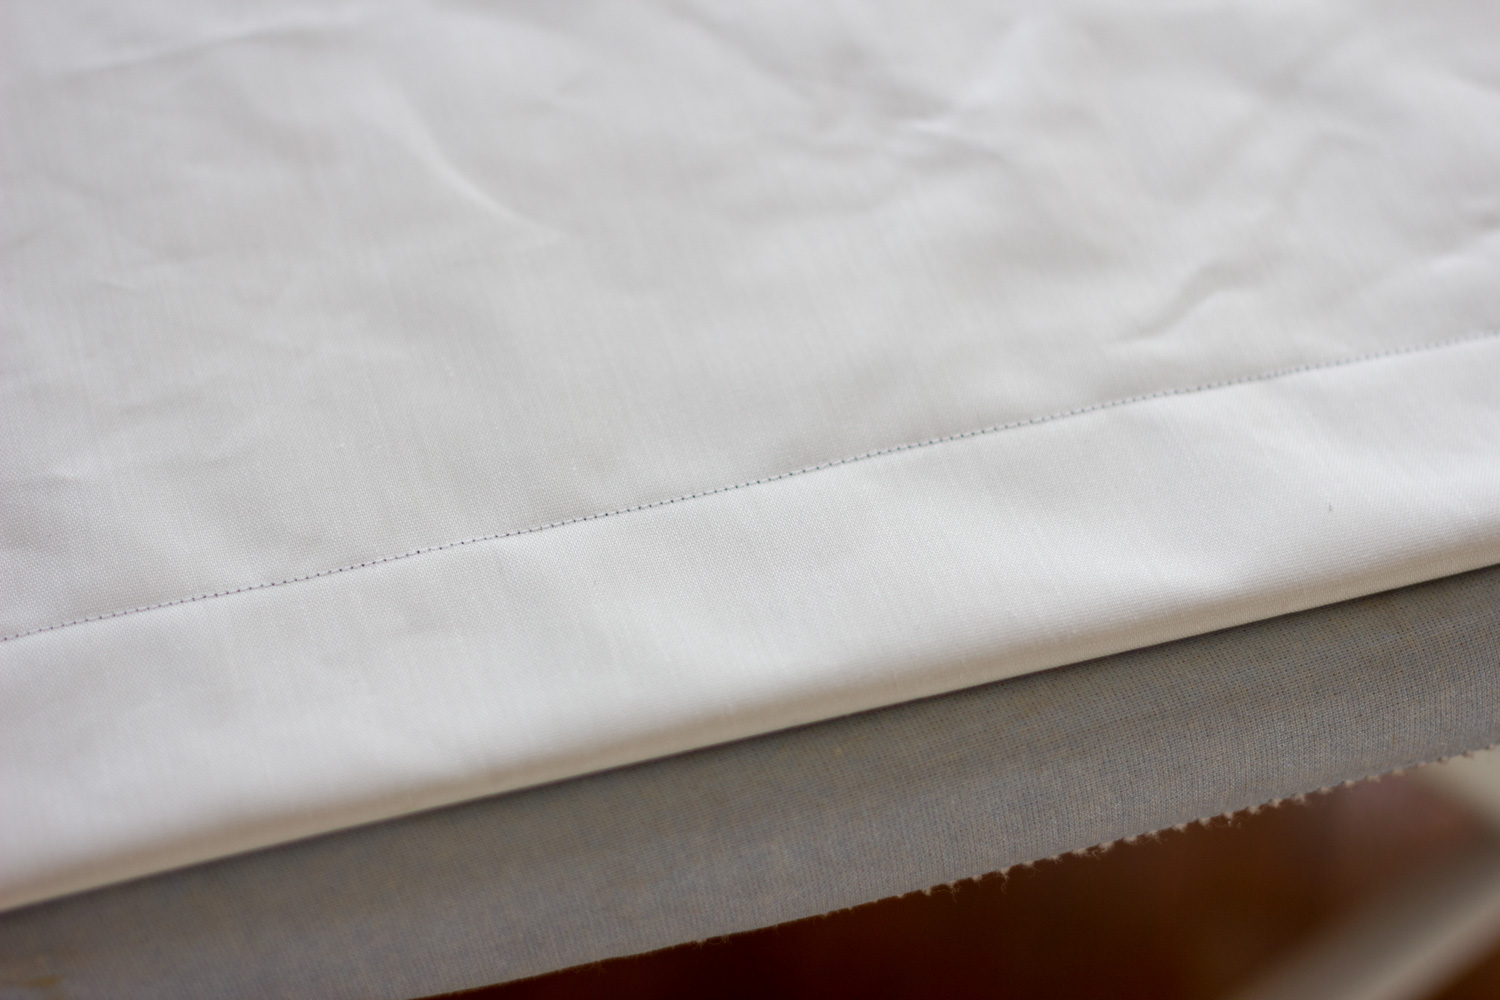
Step 7.
Press sides
This is when it really starts taking shape. Iron both sides so that the excess curtain fabric is wrapped around to the back. This way from the front you only see the curtain fabric creating a nice clean edge, no lining should be visible. Ideally, you’d want the edge to be a bit thicker than mine. The rose-printed fabric I fell in love with wasn’t very wide to begin with so I didn’t want to lose too much in the process. I only cut my lining 3” narrower than the curtain fabric, but if that’s not an issue for you I’d advise going narrower so that your edge is thicker.

Step 8.
Hem the top
The last step is to fold over the top and hem. This doesn’t need to be a double fold like the bottom, instead just fold over 3” and press. Then fold the remaining raw edge under half an inch or so, ensuring the top of the lining is covered, pin and stitch. You don’t have to make the top hem this thick if you’re using rings with clips to hang your curtains, but I think it looks more polished to have a thicker hem, plus it would accommodate a rod if you wanted to hang them that way.


Hooray! Now it’s time to hang your panels. And here’s my number one tip when installing curtains (whether handmade or purchased)… once you have them hung go through and define each fold, then use scraps of fabric to loosely tie them in place for a couple of hours. Seriously, this works wonders helping the panel learn how to drape!

I’m so happy to have this project completed. And even more happy that I can finally share the finished nursery with you guys. Check back next week for the full reveal!
